Nuxt integration
Code samples to use JoinStories widgets inside a Nuxt project
TeamId and widget alias
You will need your team id and the widgets' alias you want to integrate. You can find both of them in the Integration tab of your widget on studio.
To create a widget, check the documentation.
Integration with Nuxt
Our widget is not compatible with server side rendering (SSR).
You can easily add our script to a component, but it will not render server side. You can opt to display a placeholder server side. Check ClientOnly documentation.
Integration using basic widget's script
Without any step before, you can create the following Vue component:
<script setup lang="ts">
const props = defineProps<{
  owner: string,
  widgetAlias: string
}>()

useHead({
  script: [
    {
      src: `https://${props.owner}.my.join-stories.com/widgets/${props.widgetAlias}/index.js`,
      type: 'text/javascript',
      'data-join-widget-id': `join-widget-${props.widgetAlias}`,
      'data-join-widget-alias': props.widgetAlias,
    },
  ],
})

</script>

<template>
  <div :id="`join-widget-${props.widgetAlias}`" style="display:block;"></div>
</template>
And then use it like this (don't forget to replace team-id and widget-alias with your own) :
<JoinWidget team-id="<team-id>" widget-alias="<widget-alias>"/>
Congratulations, you should see your widget displayed.
Integration using our NPM package
Before going further, check installation steps.
After installing our npm package, you can create the following Vue component:
<script setup lang="ts">
  import {renderBubbleList} from "@join-stories/widget-bubble-list";

  const props = defineProps<{
    teamId: string,
    widgetAlias: string
  }>()

  const divId = `bubble-list-${props.widgetAlias}`;

  onMounted(async () => {
    // Wait for the next tick to ensure the DOM is ready
    await nextTick()
    renderBubbleList(divId, props.teamId, props.widgetAlias)
  })
</script>

<template>
  <div :id="divId"></div>
</template>
And then use it like this (don't forget to replace team-id and widget-alias with your own):
<JoinWidgetBubbleList team-id="<team-id>" widget-alias="<widget-alias>"/>
For more details about our NPM package, see NPM Package integration.
Prevent CLS
Content layout shift
When the widget is first displayed, it may cause Content layout shift (CLS). To avoid this, you may add custom CSS to reserve space on the page.
Retrieve CSS
Join Stories generate the style automatically for standard widgets. You can get the generated style in the integration panel of your widget on Studio.
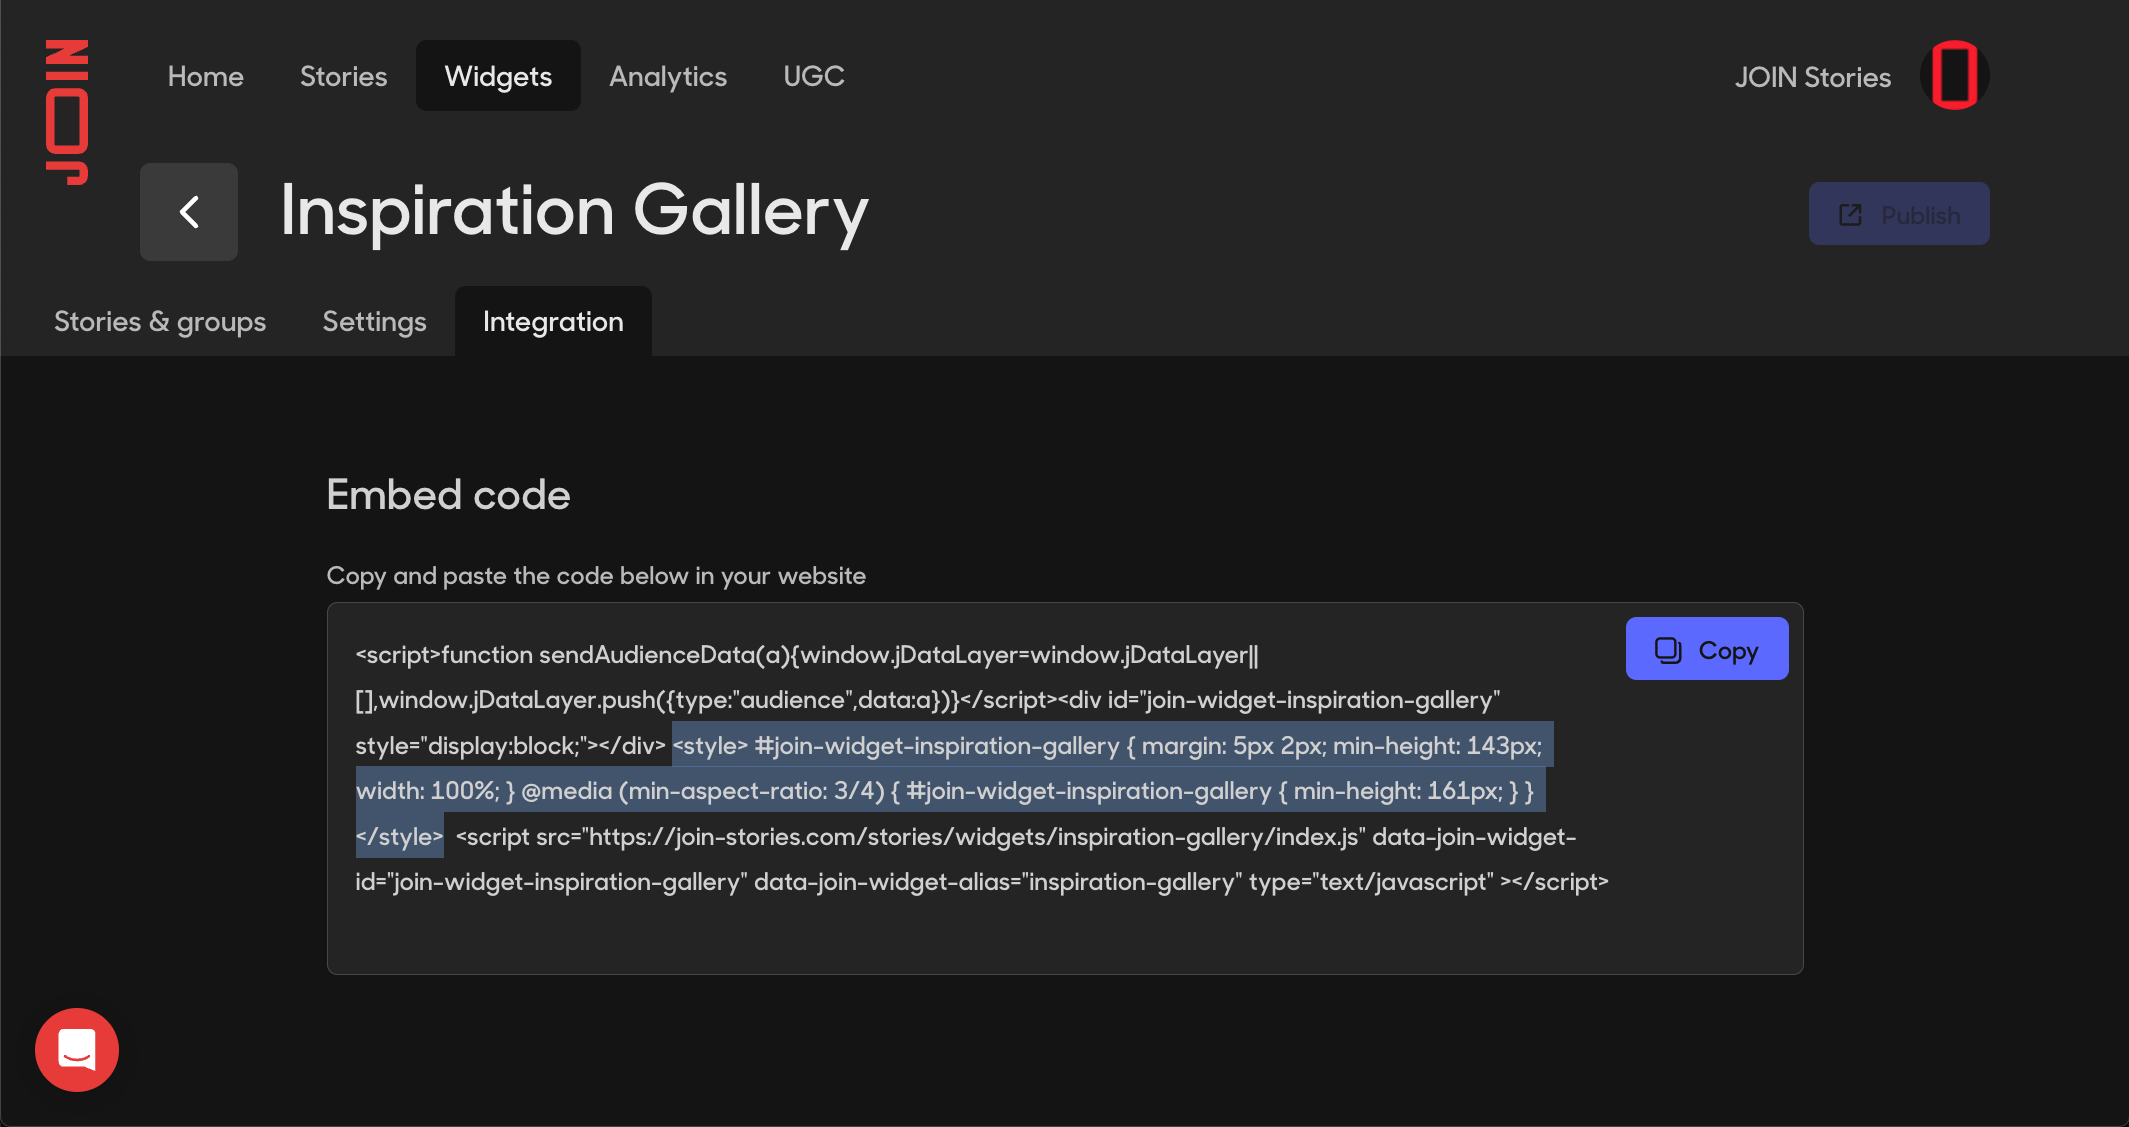
The style depends on the shape and size of your widget. For fully custom integration you may need to adapt these values.
Add it to component
You can take the generated style and apply it using a class name, like this:
<scrip>
  // ... script content
</scrip>

<style scoped>
.join-widget-trigger {
  margin: 5px 2px;
  min-height: 143px;
  width: 100%;
}
@media (min-aspect-ratio: 3/4) {
  .join-widget-trigger {
    min-height: 161px;
  }

}
</style>

<template>
  <div class="join-widget-trigger" :id="`join-widget-${props.widgetAlias}`" style="display:block;"></div>
</template>
Analytics
Global script integration
To properly trigger Analytics events, you need to integrate our global script.
JS script integration
See Documentation to retrieve the script link. Then add it in you website's head. You should replace <team-id> by your own Team Id.
<script setup lang="ts">
useHead({
  script: [
    {
      src: "https://<team-id>.my.join-stories.com/scripts/global.js",
      type: "text/javascript",
    },
  ],
});
</script>

<template>
  ....
</template>
NPM package integration
On your entry component (i.e App.tsx), you need to import and call the init function. You should replace <team-id> by your own Team Id.
<script setup lang="ts">
  import { initGlobalScript } from "@join-stories/global-script";

  onMounted(() => {
    initGlobalScript("<team-id>");
  });
</script>

<template>
  ....
</template>
See NPM Global Script Integration for more details about the method.
Page change events
Since Nuxt does front end routing, Our Analytics cannot properly detect pages navigation. You need to add a Nuxt plugin to listen to router events and send Events in our Analytics stack.
Without NPM package
When our global script starts, it exposes utility functions in a reserved namespace JoinStories.
export default defineNuxtPlugin(() => {
  const router = useRouter();

  router.beforeEach((to, from) => {
    if (!from.name || from.name === to.name) {
      return;
    }
    window.JoinStories?.sendPageExitEvent();
  });

  router.afterEach((to, from) => {
    if (!to.name || from.name === to.name) {
      return;
    }
    window.JoinStories?.sendPageViewEvent();
  });
});
With NPM package
Our package exposes functions to trigger an Analytics event.
import {
  sendPageExitEvent,
  sendPageViewEvent,
} from "@join-stories/global-script";

export default defineNuxtPlugin(() => {
  const router = useRouter();

  router.beforeEach((to, from) => {
    if (!from.name || from.name === to.name) {
      return;
    }
    sendPageExitEvent();
  });

  router.afterEach((to, from) => {
    if (!to.name || from.name === to.name) {
      return;
    }
    sendPageViewEvent();
  });
});